How to Clean Shoe Soles Like a Pro: Easy Hacks for Spotless Results
Your shoes go through a lot—especially the soles, which face daily wear from dirt, pavement, and grime. While the upper part of a shoe might stay relatively clean, the underside collects all kinds of debris. Giving attention to the soles isn’t just about appearance; it also prolongs your shoes’ life and keeps floors inside your home cleaner. Whether you’re dealing with muddy sneakers or scuffed-up soles, this guide offers a detailed, practical approach to getting them spotless.
Step One: Shake Off Loose Debris
Begin your cleaning process by removing dry, loose debris. The easiest way is to take your shoes outside and knock them together firmly. Doing this dislodges dirt clumps, gravel, or dried mud. If needed, scrape the soles gently against the edge of a step or concrete curb for a quick surface clean. This first step makes the deep-cleaning process much easier and more effective by getting rid of the bulky mess.
Step Two: Scrape Out Embedded Gunk
Dirt often gets lodged in the grooves of the tread. To remove it, grab a plastic utensil, a flat-head screwdriver, or even a house key. Gently work your tool into the indentations and lift out the compacted dirt. Go slowly to avoid damaging the tread or scratching rubber. If you’re cleaning sneakers with deep or intricate patterns on the soles, this step might take some patience—but it’s worth it.
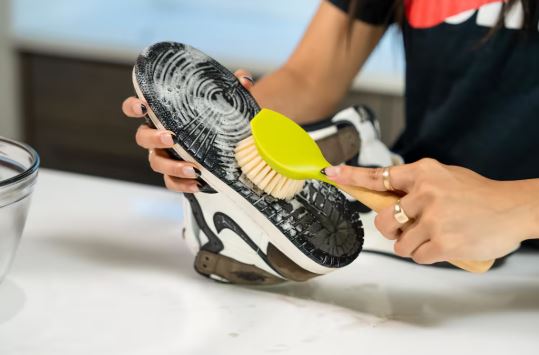
Step Three: Brush Out Hidden Dirt
Once the larger bits are out, it’s time to tackle the finer particles. Use an old toothbrush or a firm shoe brush to scrub around the contours of the soles. Pay attention to tight corners or crisscross treads. A good scrubbing will reach grime that scraping alone can’t remove. If you own a dedicated nylon shoe brush, even better—its bristles are made to handle repeated cleaning without wearing down.
Step Four: Prepare a Cleaning Soak
For a more intensive cleanse, prepare a cleaning solution in a shallow basin or tub. Fill it with warm water—just enough to submerge the bottom of your shoes—and mix in a few drops of liquid dish soap. This soapy bath loosens stubborn dirt and helps eliminate stains. Avoid immersing the entire shoe, especially if the uppers are made of fabric, suede, or leather. You want to clean the soles, not risk ruining the rest of the shoe.
See Also: A Practical Guide to Removing Chewing Gum from Footwear
Step Five: Let the Soles Soak
Place the shoes upright in the solution so only the bottoms are soaking. Let them sit for 15 to 20 minutes. This waiting period allows the soap and warm water to soften dried residue, making it much easier to remove in the next step. If your soles are especially grimy, give them an occasional shake or swirl in the water to dislodge dirt even further.
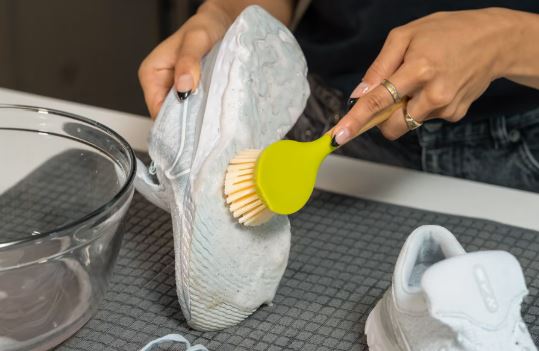
Step Six: Scrub Thoroughly with a Brush
Now that the grime has softened, grab your brush again and start scrubbing. Dip the bristles into the soapy water as needed and apply moderate pressure. Work methodically across the entire sole, including the raised edges. Tackle any stubborn stains or sticky patches until the rubber looks clean. Don’t rush—thorough brushing ensures a visibly fresher finish.
Step Seven: Rinse and Dry
When satisfied with your scrubbing, rinse the soles under a stream of warm water. If you prefer not to get the uppers wet, use a damp cloth or sponge to wipe away soap residue. Dry the shoes using a microfiber towel or soft cloth, gently dabbing and wiping until no moisture remains. Alternatively, let them air dry in a shaded, well-ventilated space. Avoid placing them in direct sunlight, as this can warp or fade certain materials.
Quick Cleaning with a Magic Eraser
If you’re in a rush or only need a surface refresh, try a magic eraser. Lightly dampen the foam block and squeeze out any extra water. Rub the eraser across the sole, targeting marks, scuffs, and general grime. Use circular and back-and-forth motions for best results. Magic erasers contain fine abrasives that buff away stains without harsh chemicals. Once done, wipe the area clean with a cloth.
Whitening Soles with Toothpaste
White soles can look dull over time, but regular toothpaste can revive them. Apply a dab of white (non-gel) toothpaste to an old toothbrush. Scrub the affected areas and let the paste sit for 10 minutes to lift discoloration. Afterward, wipe clean with a moist cloth. The mild abrasives and whitening agents in toothpaste brighten the rubber and restore a cleaner look.

Removing Stubborn Stains with Vinegar and Baking Soda
For heavy-duty cleaning, create a paste using baking soda, white vinegar, and warm water. Mix them until a fizzy, slightly gritty consistency forms. Apply the mixture to the soles using a brush or cloth. Let it sit for up to 15 minutes, then rinse or wipe away. This powerful combo helps lift grease, grime, and discoloration with minimal effort. It’s especially helpful for sneaker soles that haven’t been cleaned in a while.
Using Nail Polish Remover for Spot Treatment
For tar, oil, or mystery stains that won’t budge, nail polish remover can be a secret weapon. Dip a cotton swab in acetone-based remover and gently dab the spot. The solvent quickly breaks down oily or adhesive residues. Just be cautious not to let the solution touch fabric or dyed materials—it may cause fading or bleaching. Rinse or wipe immediately after treating the area.
Tackling Deep Grime with Bleach (with Care)
To restore white soles that have yellowed or become deeply stained, diluted bleach can be effective. Mix one part bleach with five parts water and stir well. Use a brush or toothbrush to apply the solution to the sole. Scrub lightly, and watch as the discoloration fades. Always wear gloves and work in a well-ventilated area when handling bleach. Never use it undiluted, and avoid contact with colored materials.
Preventive Maintenance Tips
Once your soles are clean, consider taking steps to prevent future buildup. You can spray them with a shoe-protecting spray that helps repel dirt and moisture. Also, make it a habit to knock off dirt or give them a quick wipe after each wear—especially if you’ve walked through grass, mud, or sand. Storing your shoes properly, such as on a rack, will also prevent them from picking up unnecessary dust and debris.
When to Call in the Professionals
If you’re dealing with valuable shoes, persistent stains, or a delicate material that you’re hesitant to clean yourself, it’s smart to take them to a professional. Cobbler shops and sneaker cleaning services can restore shoes to near-new condition using specialized tools and treatments. This is especially helpful for high-end footwear or shoes made with premium materials.
Final Thoughts
Cleaning your shoe soles doesn’t require fancy tools or expensive products. With household items like soap, vinegar, baking soda, and even toothpaste, you can refresh your shoes easily. By following a few simple steps—scraping, soaking, scrubbing, and spot-treating—you’ll restore the cleanliness and longevity of your footwear. Regular maintenance makes future cleaning easier and helps your favorite pair stay in rotation longer.
Frequently Asked Questions about Cleaning Shoe Soles
What’s the best way to remove stuck-on dirt from shoe soles?
Use a plastic tool like a knife or key to scrape out dirt from grooves, then follow up with a stiff brush to clean harder-to-reach spots.
Can I soak the soles of my shoes in water?
Yes, but only the soles. Use a shallow container with warm, soapy water, and avoid submerging the uppers to prevent damage.
How can I make my white soles look bright again?
Apply white toothpaste with a toothbrush, scrub gently, let it sit for 10 minutes, then wipe clean for a brighter finish.
Are there fast methods to clean soles without soaking?
Yes, a slightly damp magic eraser can quickly buff away scuffs and stains with minimal effort.
Is bleach safe to use on shoe soles?
Diluted bleach (1 part bleach to 5 parts water) can be effective for white soles, but avoid contact with colored areas and use it in a well-ventilated space.